Sunday, September 2, 2018

What Brush Do I Need?


Fall Leaves, Pear and Grapes

11” X 14”


 Summer is coming to an end and I look forward to the road trip we will be taking soon with our daughter and son-in-law.  The road trip is an 8 hour drive though the “Fall Leaf Trail Of Oklahoma”.  The leaves will begin to show their beautiful yellows, oranges, reds, and varied greens.  Because I have always loved fall leaves, it inspired me to paint this painting of a pear, fall leaves, grapes and a couple of crab apples.  In this painting, I wanted to show more brush work on the pear.  This painting is available on my website http://artsdesireonline.com.

Thought of the Day:

A writer is equipped at all times with sharpened pencils and paper to jot down notes. A cook always has a collection of spices in his kitchen ready to create the next extravaganza. And artists must have supplies at hand to be able to catch the moment of inspiration and translate it to canvas. 

 Tip of the Day:

Brushes, brushes, all those rows and rows of paint brushes.  Which ones do I need?  I hope to help you answer that question in this Tip of the Day.
Brushes come in a variety of styles, shapes and hairs.  Eventually, you’ll determine your own favorite brushes to use. As you paint, you will become increasingly familiar with the way the brushes handle the paint and what they can accomplish for you. Pretty soon the paint brush will become a part of you that you intuitively know how to maneuver.

 Until then, you’ll probably want to experiment with a few different brush types and sizes.  Here are some basic brush descriptions, though the length of the bristles often varies from brand to brand.

 BRUSH SHAPE


Round with a pointed tip.


DESCRIPTION AND Usage:  The Round paint brush is mostly used for painting detail, wash, fills, and thin to thick lines. A pointed round is used for fine detail and has very short hair.  MEDIA: All  FIBER:  All hair, Synthetic


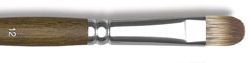
Bright flat with short fibers and square end.


DESCRIPTION AND Usage: The Bright paint brush is short-length hairs, usually set in a long handle. Width and length of brush head is about equal. Useful for short, controlled strokes, and with thick or heavy color.  Used as a general paint brush.  MEDIA:  Oil, Acrylic, Decorative. FIBER:  Sable, Mongoose, Badger, Bristle, Synthetic


Flat same as Bright with longer hairs.
 

DESCRIPTION AND USAGE: The Flat paint brush is square-ended, with medium to long hair.  It provides lots of color capacity and maneuverability.  Use for bold, sweeping strokes, or the edge for find lines.  Use heavy filling for heavier paint.  MEDIA:  All  FIBER:  Sable, Mongoose, Badger, Bristle, Synthetic

Filbert flat with rounded end.


DESCRIPTION AND USAGE:  The Filbert paint brush is thick, flat ferrule and is oval-shaped with medium to long hairs.  Natural hair is more suitable for blending because the hairs hold together when wet.  With its soft rounded edges, the filbert is also suitable for some flower and figurative work.  MEDIA:  All  FIBER:  Sable, Mongoose, Badger, Bristle, Synthetic.


 Script Liner small round, long hair.


DESCRIPTION AND USAGE:  The Script Liner paint brush is pointed, narrow brush with very long hairs.  Liners are shorter and narrower.  It has a large color carrying capacity. Useful for delicate lettering, highlighting, outlining, and long continuous stokes.  Used a lot in Landscapes for tree limbs, grass etc.   MEDIA: All  FIBER:  Sable, Ox, Synthetic.


Mop flat, thick, soft hairs with a round end.


DESCRIPTION AND USAGE:  The Mop paint brush comes in a varied shapes.  The oval mop has rounded hairs and produces a soft edge, with no point.  A mop brush is useful for laying in large areas of water or paint, blending, softening and for absorbing excessive media. MEDIA:  All   FIBER:  Squirrel, Ox, Synthetic.


 Fan flat and shaped like a fan.


DESCRIPTION AND USAGE: The Fan paint brush has spread hairs.  Natural hair is more suitable for soft blending, synthetic works well for textural effects, special effects and textures.  Bristle Fan paint brushes are also used for painting trees, branches, grass and that sort of detail.  It is also popular for painting hair.  MEDIA:  Oils, Acrylics  FIBER:  Bristle, Badger, Synthetic.


BRUSH HAIR
The material used to form the tuft of a brush that picks up and spreads the paint is the most important part of the brush, and determines the performance and the price of the brush.  There are distinct advantages of both natural, synthetic, a blend, and bristle hair.

NATURAL or animal hair is a by-product of the food and fur industries, no animals are destroyed for the purpose of brush making. It has superior paint-holding ability.  Price and performance of a natural hair brush is determined by the “grade” of animal it was taken from, and the availability of its hair. Shorter-length hair is more readily available, making the longer lengths more expensive. Natural hair may be used alone (pure) or blended with other hairs or synthetic filaments to achieve a combination of performance and price.

SYNTHETICS are man-made of either nylon or polyester filaments. They can be tapered, tipped, abraded or etched to increase color carrying ability. Often, synthetic filaments are dyed and baked to make them softer and more absorbent. The common name for this filament is “Taklon.”

NATURAL AND SYNTHETIC BLEND paint brushes include a blend of natural and synthetic hairs. They combine natural hair’s ability to carry large loads of paint while the synthetic filaments provide increased durability. Many of these brushes do a good job of maintaining the qualities of natural hair while making the price more affordable. Sometimes a mixture of natural and synthetic hairs will give you just the right balance between softness and spring with the ability to hold more paint.
For the protection of the hairs on all three type brushes, most brushes are treated with a water-soluble sizing.  This should be removed by thoroughly washing with brush soap and water or special brush care products before use.

 BRISTLE paint brushes made from Hog's Hair Bristle (or Boar's Hair Bristle) are the firmest of the natural hairs. They are more often used by oil and acrylic artists but sometimes find their way into the hands of watercolor artists. They have split ends at the tips called "flags" for holding lots of liquid and adding "texture". Good Bristle brushes are tough, long lasting and maintain their shape for a long time. 
 

BRUSH SIZE    
The size of the brush is indicated by a number printed on the handle. Brushes start from 000, then 00, 0, 1, 2, and up. The higher the number, the bigger or wider the brush.  Unfortunately, there is little consistency between brush manufacturers as to what these sizes actually are, so a number 10 in one brand can be a different size to a number 10 in another brand.

I have attempted to answer the most commonly asked questions about brushes to help you select the brush that will produce the most satisfying results.  If you have any further questions, please leave a comment and I will answer them in my next blog.

 Thank you for visiting my blog.  Please do not hesitate to make a comment below or email me at ritahjohnsonfineart@gmail.com.  I welcome your feedback.

If you know of anyone that may appreciate the things I am sharing, about painting, please let them know about this blog.  I hope to offer more painting tips as this conversation continues.  


Please share this blog on social media by clicking on the appropriate box below!


Friday, April 27, 2018

Painting Surfaces


Red Rose 

10” X 8”

 On Dream Canvas


I first discovered this type of canvas years ago and could not wait to paint on it.  It had a different surface than I had painted on in the past and because red roses were always my mother’s favorite flower, I decided that was what I wanted to paint. As I worked on it, it quickly became a favorite.  Not only the beautiful red rose but also the support on which I was painting. The canvas is made of nylon and can be used for any type of medium, pen and ink, watercolor, acrylic or oils. They are very smooth, durable, and will outlast many canvases made of other fabrics.  Another painting on this “Dream Canvas” is my Magnolia on the home page of my website at http://artsdesireonline.com.  There is a link at the top of the page.  The Magnolia is probably my favorite painting of all the paintings I have done.  


I do have more information on these canvases and several different standard sizes and colors for sale on my website


Thought of the Day:


Someone once said that your growth as an artist will take a lifetime. It is a continuous path of frustration and joyful insight. You will never know everything, and most painters quit before they discover who they really are as an artist. When your imagination employs the rich sensory memory of all that you have experienced, the artwork you create becomes alive, and this is what the world is waiting to see in your paintings.


Tip of the Day:


Today’s tip is about the surface on which you paint.  It is called a “support”.  We have all been to our local art store, looked down the racks of canvases and wondered, “Which one do I choose?”  I am going to give you several different opinions on this very subject.  I suggest that you try different supports and then decide what is right for you. 


In this Tip of the Day I will be discussing panels and pre-stretched canvases that you purchase and not those you stretch yourself.  When choosing a support, even though it is a personal preference choice because you can really paint on anything you desire.  Setting this aside, there are a few things we need to consider.  


Whatever support you choose must be sealed.  Artist use a verity of products to seal their support.  A lot will depend on the type of support you are going to use. So let first look at a few of the most common ones.


Panels, Boards:  Panels can range from canvas panes to fiberboard, for example.  Canvas panels are usually made of some type of cardboard and then covered in canvas, most likely cotton.  They are very inexpensive and are not very durable.  They warp very easily and if they get damp, the canvas will separate from the cardboard.  If you think you will just use them to practice a painting, that painting will turn out to be one of your best and there you have in on a cheap, horrible support. I do not recommend them for any use.


A lot of artist use fiberboard for small painting, usually under 16” X 20”.  Anything over 14” X 18” gets really heavy so they switch to stretched canvas, most stretching their own and using linen. I know some artist who go to their local home improvement store, purchase a large sheet of fiberboard and have the store cut the exact sizes they want.  The artist pre-plans all the cuts before the purchase.  Fiberboard makes a great surface to paint on and is less expensive than a lot of other supports.  To seal the fiberboard you can use several products.  For example, you can use three or four coats of gesso.  You have to let each coat dry and lightly sand before adding the next coat.  You can use one or two coats of white acrylic or oil paint, again lightly sanding between each coat.  One artist I know sprays several coats of Rust-Oleum White Auto Primer and you do not have to sand it.  It is probably more permanent than gesso.  The number of coat of sealer you put on you board will be determine by the texture you personally prefer.

It does take a little patience, practice and getting adjusted to painting on fiberboard.  The texture is very smooth but once it is sealed, the paint will not be absorbed into the board as it does with most pre-stretched canvases that are not properly sealed.  


Pre-Stretched Canvas:  Pre-stretched canvases are varied to say the least.  Of course, they vary in size but it is the texture of the surface that we are most concerned.  Pre-stretched canvases are available in all price ranges, from very inexpensive to very expensive.  So what is the difference?  The obvious is cheap price, cheap quality.  The next thing is the type of fabric used and the surface texture.  Most store bought pre-stretched canvas are made from cotton.  Some have a larger weave, which makes the surface rougher, and some have a tighter weave, which makes the surface smoother. They are usually referred to as medium texture or smooth texture.  A rough texture or a smooth texture also depends on how many coats of gesso have been applied to the surface.  Again, a lot of store bought canvas will say, “Primed with three coats of gesso”.  In most cases, in my opinion, that is not enough.  You can always add more gesso, just very lightly sand between each coat. 

If you are painting the “Bob Ross” method, a medium texture would be best.  It takes a rough surface, and a very stiff paint, to paint snow on the mountains.    However, that is the only reason I would personally ever recommend a medium texture canvas.  The weave is large and a painter has to really work to fill in all those little holes.  Bob Ross uses a lot of paint and it is easy to cover the canvas.


Most professional artist paint on fiberboard and/or linen canvas and sometimes on cotton.  When I paint on cotton, I use Fredix Blue Label Ultrasmooth canvas.  I love the smooth texture it provides.  That is also why I really enjoy painting on the Nylon canvas on which I painted the “Red Rose” above and also the “Magnolia” on my website.  The texture is wonderful and it takes less paint.   

Please visit my website for further information on what sizes and colors are available and how you may purchase them.


Dream Canvas


Available in White, Gray or Black.  

To get more info or order canvases click on the picture above in the right column!


Question of the Day:

 Because of the length of this blog, there is no Question of the Day.


 Thank you for visiting my blog.  Please do not hesitate to make a comment below or email me at ritahjohnsonfineart@gmail.com.  I welcome your feedback.


If you know of anyone that may appreciate the things I am sharing about painting, please let them know about this blog.  I hope to offer more painting tips as this conversation continues.  

Please share this blog on social media by clicking on the appropriate box below!


Thursday, February 15, 2018

A New Beginning


          Yellow Rose Bud

                         20" X 16"

      Click to Purchase or get more info


Welcome to my new blog.  Let me introduce myself.  My name is Rita Johnson and I am an artist and instructor.  I have been painting for many years.  If you would like to know more about me, please visit my website at the link at the top of this page.

With this "Rita's Palette Talk" blog, I hope to share with you my insights and observations of the world around us as seen through the eyes of a painter. To capture that "Moment In Time".  My goal is to move, touch and inspire collectors, non-painters, beginners and those who having been painting for a long time.  

I rarely paint anything larger than life but in this painting, Yellow Rose Bud, I could not resist.  I was so inspired by its beauty that painting it smaller just did not do it justice.   As you will see in future posts I love darker backgrounds in my still life paintings and the drama that it brings.  The darker background with the warmth of the beautiful yellows and reds bring contrast to the painting.  I then added a few cool areas of red-purple in the calyx.  The painting turned out exactly as I had imagined it. 

Thought of the Day:  

The most important time that you can spend on any painting is the first ten minutes, for some it may take longer.  This is a time of not painting but thinking.  When you start a painting, it is important that you have a clear vision of the completed piece before you start.  Having a strong mental picture of what you wish to see on the canvas means that you think about the finished details of the painting. This could also include how the finished painting would look framed and hanging on the wall.  Once you have a vivid mental picture of the completed painting , you will be able to capture the image more clearer. 

Tip of the Day:

Because this is my first post on my blog, my tips may be a little basic for some of you but as I said, my goal is to reach painters at all levels.  So I will be starting with the basics and hope it just may be something you have not heard before or at least, a refresher.

It has been said that when the eye is open, it sees only three things, shapes, values and edges.  Let's look at each one briefly. 

Shapes:  Everything has a shape.  The simplest shapes to recognize are silhouettes or outlines of the whole objects. Almost as easy to recognize as  the over-all shape of the object are the shapes within it.   For example, we can recognize the shapes of light and shadow on an object.  Actually, these shapes are the most useful ones to the artist in creating the illusion of form or reality on the flat surface of a painting because they tell the true form of the object.

Values:  The second thing we must recognize in understanding the process of seeing is value.  Value simply means the lightness or darkness of a shape.  These can easily be seen in a black and white photograph.  But how does that relate to the painter?  The painter needs to recognize and understand that each color (Hue) you will be using to create a painting will also have light or dark properties.  For example, pink is a color of light value, where as violet is a color of dark value.  However, each color can be changed in value by adding either a darker color to it or a lighter color to it.  Value is most important to keep in mind.  If the value of a color is wrong then the whole color is wrong.

Edges:  As you look at the two factors above, (again using a black and white photograph for example)you will probably notice the presence of edges between shapes and different values.   Edges can be either hard or sharp, or soft and fuzzy.  For the artist, one important reason for seeing different edges is that it will enable you  to paint forms solidly and conveniently.  The edges vary directly with the form.  For example, see Five Basic Shapes below, the edge between the light and shadow planes of a cube or other angular form will appear very sharp, while the edge between the light and shadow sides of a cylinder or sphere will be soft and wide. On a smoothly curled surface like a sphere or cylinder, there is a gradual transition between the light side and the side which is in shadow.  This creates a definite area of halftone between the light and shadow which must be recognized and painted if we are to reproduce the illusion of the real object on our canvas. 

Five Basic Shapes,Values and Edges
Sphere, Cube, Cylinder, Cone and Solid Triangle  

Question of the Day: 

I invite you to ask any questions you would like me to answer about painting.  I will be happy to share with you what I know.  Please do not hesitate to email me at ritahjohnsonfineart@gmail.com
I welcome your feedback.

If you know of any artist that may appreciate the things I am sharing about painting, please let them know about this blog.  I hope to offer more painting tips as this conversation continues.